Discover the Easiest Greek Tiropita: No Phyllo, Pure Delight
Imagine biting into a warm, savory slice of the famous Greek cheese pie, tiropita – but without the fuss of delicate phyllo pastry or hours spent in the kitchen. For many home cooks, the traditional
Quick 1-Hour Tiropita: Easy Greek Cheese Pie, One Bowl Recipe with its endless layers of paper-thin dough can seem daunting. What if we told you there’s a secret, simpler path to this beloved Greek staple? Welcome to the world of the easiest
greek tiropita recipe you'll ever find – a quick cheese pie that delivers all the authentic flavor with none of the usual complexities.
This innovative approach to tiropita bypasses the traditional phyllo entirely, opting instead for a gloriously fluffy, cheesy batter that bakes into a golden, satisfying pie. Perfect for a busy weeknight meal, a casual brunch, or a crowd-pleasing appetizer, this recipe will transform your perception of Greek cooking. Get ready to experience the rich, tangy taste of feta and the comforting warmth of a freshly baked cheese pie, all ready in just over an hour from start to finish.
Why This No-Phyllo Greek Tiropita Recipe is a Game-Changer
Traditional tiropita, while undeniably delicious, often involves intricate layering of phyllo pastry, brushing each sheet with butter or olive oil. While the results are spectacular, the process can be time-consuming and intimidating for novice bakers or those short on time. This easy
greek tiropita recipe eliminates that hurdle completely, offering a revolutionary one-bowl solution that focuses purely on flavor and convenience.
*
No Phyllo, No Problem: The biggest advantage is, of course, the complete absence of phyllo dough. This means no thawing, no delicate handling, and no fear of tearing.
*
One Bowl Wonders: Everything comes together in a single large bowl, drastically cutting down on washing up – a true blessing for any busy cook.
*
Quick Prep: You'll spend mere minutes (think 10-12 minutes!) mixing the ingredients before it goes into the oven. The majority of the time is hands-off baking.
*
Fluffy, Cheesy Texture: Instead of a crispy crust, you get a tender, cake-like texture, bursting with cheesy goodness, proving that you don't need phyllo for an authentic experience.
*
Accessible Ingredients: Most ingredients are pantry staples or easily found at any grocery store, making this a spontaneous treat rather than a planned expedition.
This isn't just a shortcut; it's a smart, delicious alternative that ensures everyone can enjoy a homemade Greek cheese pie.
Crafting Your Easy Greek Tiropita: The Key Ingredients
The magic of this simplified
greek tiropita recipe lies in its humble yet powerful ingredient list. Each component plays a crucial role in creating the perfect texture and flavor profile.
*
Greek Yoghurt (200g / 7 oz): This is a cornerstone, contributing moisture, a subtle tang, and aiding in the batter's rise for that desirable fluffy texture. Opt for full-fat Greek yoghurt for the best results and richness.
*
Feta Cheese (150g / 5.3 oz): The star of the show! Always choose an authentic, imported Greek feta if possible. Its salty, briny notes are essential for the distinctive tiropita flavor. Crumble it into small pieces for even distribution throughout the pie.
*
Cottage Cheese (200g / 7 oz): This adds a lovely creaminess and lightness to the pie, helping to achieve that soft, melt-in-your-mouth consistency. For a slightly denser, richer texture, you can substitute with ricotta cheese.
*
Strong Grated Yellow Cheese (100g / 3.5 oz): This brings depth of flavor and excellent melting qualities. Traditional Greek choices like Kefalotiri or Mizithra are fantastic if you can find them. Otherwise, a sharp Parmesan, a nutty Gruyere, or even a strong cheddar work beautifully, adding a lovely golden crust.
*
Eggs (5 large): Essential for binding all the ingredients together, adding richness, and contributing to the pie's structure and rise.
*
Self-Raising Flour (approx. 100g / 3.5 oz): This is key to the "no phyllo" structure. The self-raising properties help create a light, airy, and slightly cake-like base, eliminating the need for separate leavening agents. Adjust slightly based on your yoghurt consistency, but aim for a runny batter.
*
Black Pepper: A generous crack of fresh black pepper enhances the savory notes of the cheeses.
*
Sesame Seeds (optional): A sprinkle of white and/or black sesame seeds on top before baking adds a beautiful visual appeal and a subtle nutty crunch.
Whipping Up Your Easy Greek Tiropita: A Step-by-Step Guide
This simple
greek tiropita recipe is designed for speed and ease, making it a perfect introduction to Greek cuisine or a quick fix for cravings. Follow these steps for a perfect pie every time.
1.
Preheat & Prep: Preheat your oven to 180°C (350°F). Line a medium baking tray (approx. 20x30 cm or 8x12 inches) with baking paper. This ensures easy removal and a lighter pie. If baking paper isn't available, a light coating of olive oil will suffice, though the paper gives a cleaner finish.
2.
Crumble the Feta: In your large mixing bowl, crumble the feta cheese into small, even pieces. This allows the salty feta to disperse beautifully throughout the pie.
3.
Mix in Grated Cheese: Add your chosen strong grated yellow cheese to the bowl with the feta. Give them a quick stir to combine.
4.
Add Dairy Wonders: Pour in the Greek yoghurt and cottage cheese. Stir gently until well incorporated with the cheeses. The mixture will start to look creamy and inviting.
5.
Eggs and Pepper: Crack in the five eggs and add a generous grinding of black pepper. Stir vigorously for a couple of minutes until the mixture is smooth and well blended. At this stage, the consistency will be quite runny – this is exactly what you want!
6.
Fold in Flour: Gradually fold in the self-raising flour. Mix until just combined; avoid overmixing. The batter should still be fluid and somewhat runny. Adding too much flour can make the final pie dense or "stodgy," so resist the urge to thicken it excessively. This light consistency is part of the charm of this particular
greek tiropita recipe.
7.
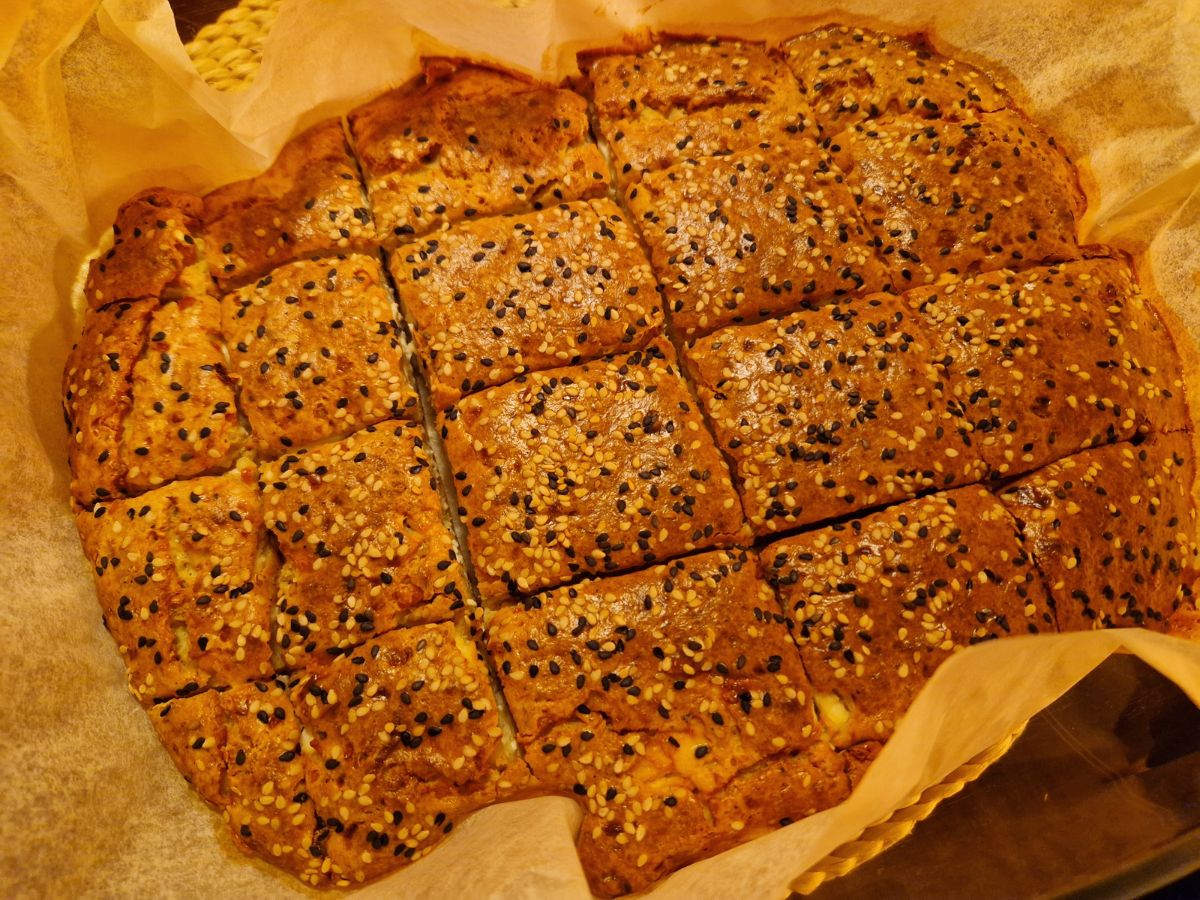
Pour and Decorate: Pour the entire mixture into your prepared baking tray. Gently smooth the surface with a spatula. If using, sprinkle generously with sesame seeds (a mix of white and black looks particularly appealing).
8.
The Two-Stage Bake: This is a crucial step for perfect results.
* Bake for the first 30-35 minutes.
* Carefully remove the tray from the oven and *cut the pie into serving pieces* while it's still warm and soft. This is essential for even cooking, ensuring the center sets properly and doesn't remain undercooked.
* Return the tray to the oven and bake for another 15-20 minutes, or until the pie is beautifully golden brown, firm to the touch, and cooked through. If you have a bit more time, allowing it to rest in the turned-off oven for an additional 10-15 minutes can help it set even better.
9.
Cool and Enjoy: Let the pie cool slightly in the tray before serving. This allows the cheese and batter to set fully, making for cleaner slices and a more enjoyable texture. Slice and serve warm!
Tips for the Perfect Golden Pie and Delicious Variations
To truly master this easy
greek tiropita recipe and make it your own, consider these tips and variations:
*
Cheese Swaps: Don't be afraid to experiment with your cheese blend. For a truly authentic Greek taste, seek out *graviera* or *kaseri*. For readily available options, a blend of sharp cheddar and mozzarella can also work, providing a different but equally delicious flavor profile. The key is a mix of tangy, salty, and melty cheeses. Learn more about versatile options in this
Simple Greek Tiropita: Fluffy Feta Cheese Pie: No Rolling article.
*
Herbs and Spices: Elevate the flavor with fresh herbs. A handful of chopped fresh dill, parsley, or mint can add a wonderful aromatic dimension. A pinch of nutmeg also complements the cheesy notes beautifully.
*
Adding a Savory Kick: For a more substantial pie, consider sautéing a small amount of finely chopped onion or leek until softened, then mixing it into the batter. Cooked spinach (squeezed dry) is another excellent addition, turning it into a Spanakopita-Tiropita hybrid!
*
Serving Suggestions: This tiropita is fantastic on its own as a snack or light meal. Serve it alongside a fresh Greek salad for a complete and healthy lunch, or as part of a meze platter. It’s also a wonderful addition to a brunch spread.
*
Storage: Leftovers can be stored in an airtight container in the refrigerator for 3-4 days. Reheat gently in the oven or microwave.
This simplified
greek tiropita recipe is a testament to the idea that delicious, authentic flavors don't always require complicated techniques. It's a quick, satisfying dish that brings a taste of Greece straight to your table, proving that the easiest path can often lead to the most delightful culinary discoveries. Enjoy the process, and savor every golden, cheesy bite!